配置 StrongSwan及Quagga
为了配置位于 Datacenter VPC 中StrongswanEC2 连接 AWS CGW, 需要更改 Strongswan 的配置文件以及Quagga 路由。
得到 StrongSwan EC2 实例的公网 IP 地址
- 点击进入 Cloudformation console
https://us-east-2.console.aws.amazon.com/cloudformation/home?region=us-east-2#/stacks?filteringStatus=active&filteringText=&viewNested=true&hideStacks=false
选择 tgw-strongswan 堆栈, 选择 outsputs tab
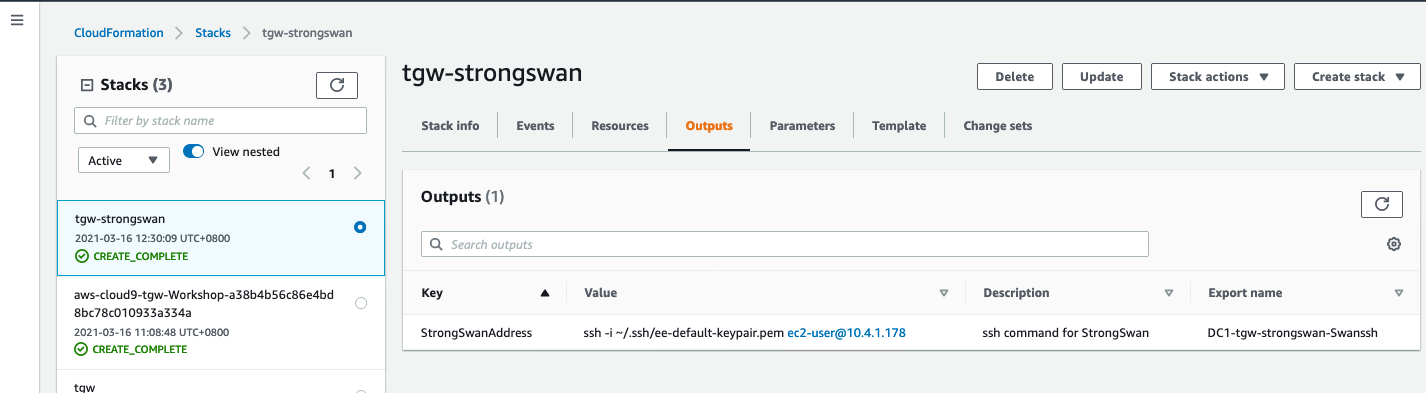
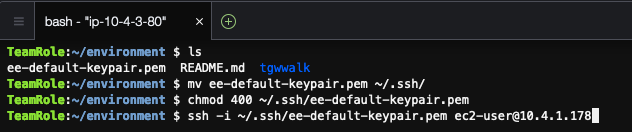
- 复制 Value 列值,并在cloud9 terminal window 输入
ssh -i ~/.ssh/ee-default-keypair.pem ec2-user@10.4.1.178
如下图所示:
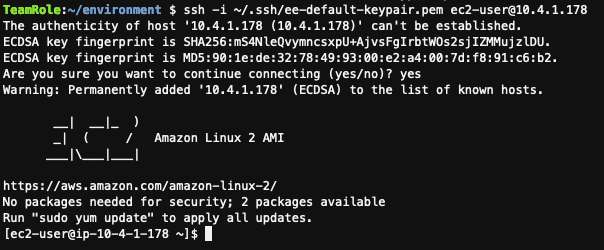
 输入 Yes
 成功的 ssh 登录到 strongswan 实例。
查看 Strongswan 配置文件
1.继续输入
sudo cat /etc/strongswan/ipsec.conf
输出如下
[ec2-user@ip-10-4-1-178 ~]$ sudo cat /etc/strongswan/ipsec.conf
conn %default
  leftauth=psk
  rightauth=psk
  ike=aes128-sha1-modp1024!
  ikelifetime=28800s
  aggressive=no
  esp=aes128-sha1-modp1024!
  type=tunnel
  dpddelay=10s
  dpdtimeout=30s
  keyexchange=ikev1
  rekey=yes
  reauth=no
  dpdaction=restart
  closeaction=restart
  leftsubnet=0.0.0.0/0
  rightsubnet=0.0.0.0/0
  leftupdown=/etc/ipsec-vti.sh
  installpolicy=yes
  compress=no
  mobike=no

conn dc2aws1
  left=10.4.1.178
  leftid=18.188.59.21
  right=TUNNEL_1_IP
  rightid=TUNNEL_1_IP
  auto=start
  mark=100

conn dc2aws2
  left=10.4.1.178
  leftid=18.188.59.21
  right=TUNNEL_2_IP
  rightid=TUNNEL_2_IP
  auto=start
  mark=200

[ec2-user@ip-10-4-1-178 ~]$
另外对于 Strongswan VPN 的配置文件,需要修改如下 2 个字段
- TUNNEL_1_IP
- TUNNEL_2_IP
查看 CGW - VPN tunnel 公网 IP 地址。
1.回到 VPC Console 页面,选择页面左侧的Site-to-Site VPN Connections. 选择 VPNID 是 “vpn-xxxxx"的链接,显示当前 VPN 链接详情。
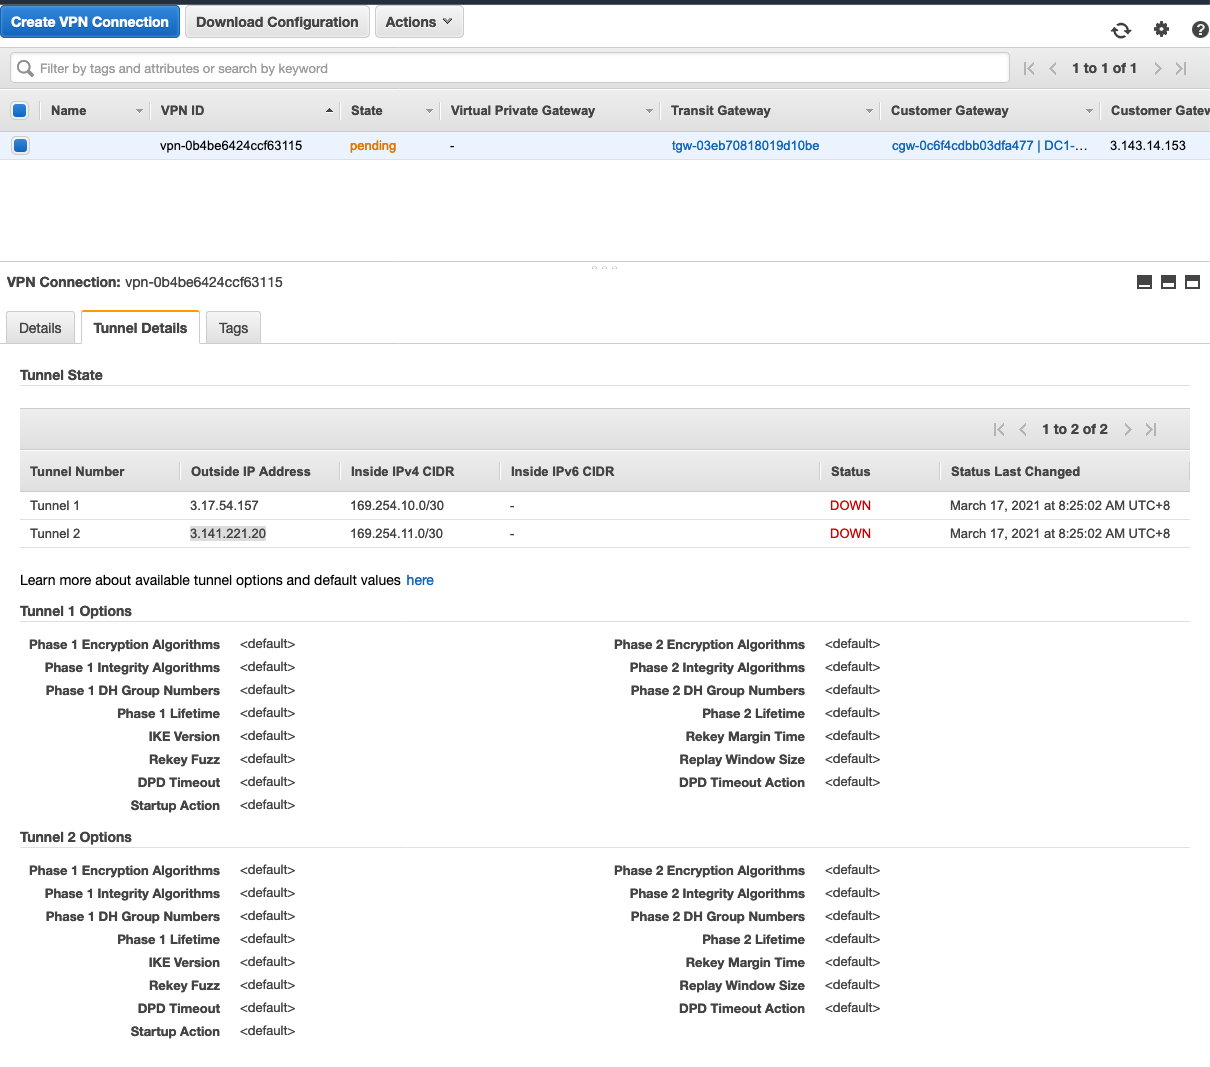
2.点击 “Tunnel Details”,当前两个 Tunnel 都是 down 的状态。说明现在同 DataCenter VPC中的 strongswan 还未建立连接。需要记录如下信息:
记录下每一个 tunnel 的 Outside IP Addrss, 例如上图所示。
- Tunnel 1的 Outside IP Addrss 是
3.141.71.57, Inside IPV4 CIDR 是169.254.10.0/30 - Tunnel 2的 Outside IP Addrss 是
3.141.221.20,Inside IPV4 CIDR 是169.254.11.0/30
这两个 IP 地址将被用于配置 StrongSwan VPN. 注意:Tunnel 1和 Tunnel 2的 Outside IP Addrss 会随着你的实验环境而不同,请确保使用你现在实验环境的实际值。
修改 /etc/strongswan/ipsec.conf
在 cloud9 terminal window 输入如下命令修改
sudo nano /etc/strongswan/ipsec.conf
显示
  conn %default
  leftauth=psk
  rightauth=psk
  ike=aes128-sha1-modp1024!
  ikelifetime=28800s
  aggressive=no
  esp=aes128-sha1-modp1024!
  type=tunnel
  dpddelay=10s
  dpdtimeout=30s
  keyexchange=ikev1
  rekey=yes
  reauth=no
  dpdaction=restart
  closeaction=restart
  leftsubnet=0.0.0.0/0
  rightsubnet=0.0.0.0/0
  leftupdown=/etc/ipsec-vti.sh
  installpolicy=yes
  compress=no
  mobike=no

conn dc2aws1
  left=10.4.2.200
  leftid=3.143.14.153
  right=TUNNEL_1_IP
  rightid=TUNNEL_1_IP
  auto=start
  mark=100

conn dc2aws2
  left=10.4.2.200
  leftid=3.143.14.153
  right=TUNNEL_2_IP
  rightid=TUNNEL_2_IP
  auto=start
  mark=200
修改 right=TUNNEL_1_IP 为 right=3.17.54.157
修改 right=TUNNEL_2_IP 为 right=13.141.221.20
** 注意:Tunnel 1和 Tunnel 2的 Outside IP Addrss 会随着你的实验环境而不同,请确保使用你现在实验环境的实际值。**
    conn %default
      leftauth=psk
      rightauth=psk
      ike=aes128-sha1-modp1024!
      ikelifetime=28800s
      aggressive=no
      esp=aes128-sha1-modp1024!
      type=tunnel
      dpddelay=10s
      dpdtimeout=30s
      keyexchange=ikev1
      rekey=yes
      reauth=no
      dpdaction=restart
      closeaction=restart
      leftsubnet=0.0.0.0/0
      rightsubnet=0.0.0.0/0
      leftupdown=/etc/ipsec-vti.sh
      installpolicy=yes
      compress=no
      mobike=no

    conn dc2aws1
      left=10.4.2.200
      leftid=3.143.14.153
      right=3.17.54.157
      rightid=3.17.54.157
      auto=start
      mark=100

    conn dc2aws2
      left=10.4.2.200
      leftid=3.143.14.153
      right=3.141.221.20
      rightid=3.141.221.20
      auto=start
      mark=200
确保修改保持过的文件如上所示:
启动 Strongswan 服务
继续在 Cloud9的 terminal window 输入命令修改路由。 启动 strongswan 服务:
sudo strongswan start
输出:
Starting strongSwan 5.7.2 IPsec [starter]...
检查 Strongswan 状态:
sudo strongswan status
输出:
  Security Associations (2 up, 0 connecting):
  dc2aws2[2]: ESTABLISHED 7 seconds ago, 10.4.2.200[3.143.14.153]...3.141.221.20[3.141.221.20]
  dc2aws2{1}:  INSTALLED, TUNNEL, reqid 1, ESP in UDP SPIs: cd2bd846_i cae35cba_o
  dc2aws2{1}:   0.0.0.0/0 === 0.0.0.0/0
  dc2aws1[1]: ESTABLISHED 7 seconds ago, 10.4.2.200[3.143.14.153]...3.17.54.157[3.17.54.157]
  dc2aws1{2}:  INSTALLED, TUNNEL, reqid 2, ESP in UDP SPIs: c4efe7b5_i c1be6aab_o
  dc2aws1{2}:   0.0.0.0/0 === 0.0.0.0/0
配置 Quagga 路由
配置 Quagga 提供 BGP 服务. 首先启动服务并配置 BGP 输入:
sudo systemctl start bgpd
sudo vtysh
conf t
no router bgp 7675
router bgp 65001
network 10.4.0.0/16
neighbor 169.254.10.1 remote-as 65000
neighbor 169.254.11.1 remote-as 65000
end
wr
输出:
Building Configuration...
Configuration saved to /etc/quagga/zebra.conf
Configuration saved to /etc/quagga/bgpd.conf
[OK]
确保我们在Quagga路由器上看到了路由。
首先,我们看一下BGP看到的内容:show ip bgp summary。 最重要的是要收到的Prefix。 如果这是处于“活动”或“空闲”状态(很可能是邻居声明错误:IP地址,AS编号),则存在配置问题。 我们想要看到的是一个数字。 假设一切设置正确,我们应该为每个邻居看到4。例如下图中的 ‘State/PfxRcd’的值是 4.
show ip bgp summary
输出:
BGP router identifier 10.4.1.178, local AS number 65001
RIB entries 9, using 1008 bytes of memory
Peers 2, using 9120 bytes of memory

Neighbor        V    AS MsgRcvd MsgSent   TblVer  InQ OutQ Up/Down  State/PfxRcd
169.254.10.1    4 65000       7       8        0    0    0 00:00:49        4
169.254.11.1    4 65000       7       9        0    0    0 00:00:48        4

Total number of neighbors 2
我们也可以通过show ip route命令看到那些路由是什么,以及我们有多少路径(Path)。 输入:
show ip route
输出
Codes: K - kernel route, C - connected, S - static, R - RIP,
      O - OSPF, I - IS-IS, B - BGP, A - Babel,
      > - selected route, * - FIB route

K>* 0.0.0.0/0 via 10.4.0.1, eth0
B>* 10.0.0.0/16 [20/100] via 169.254.10.1, vti1, 00:03:32
C>* 10.4.0.0/22 is directly connected, eth0
B>* 10.8.0.0/16 [20/100] via 169.254.10.1, vti1, 00:03:32
B>* 10.16.0.0/16 [20/100] via 169.254.10.1, vti1, 00:03:32
B>* 10.17.0.0/16 [20/100] via 169.254.10.1, vti1, 00:03:32
C>* 127.0.0.0/8 is directly connected, lo
C>* 169.254.10.0/30 is directly connected, vti1
C>* 169.254.11.0/30 is directly connected, vti2
K>* 169.254.169.254/32 is directly connected, eth0
设置 ECMP
注意,每个vpc cidr只有一个下一跳地址。我们可以通过允许等成本多路径(ECMP)来解决这个问题。回到config模式,我们将在BGP路由器中设置maximum paths为8:
conf t
router bgp 65001
maximum-paths  8
end
wr
输出
Building Configuration...
Configuration saved to /etc/quagga/zebra.conf
Configuration saved to /etc/quagga/bgpd.conf
[OK]
现在,再次执行show ip route命令。两条隧道都出现了!
show ip route
输出:
Codes: K - kernel route, C - connected, S - static, R - RIP,
      O - OSPF, I - IS-IS, B - BGP, A - Babel,
      > - selected route, * - FIB route

K>* 0.0.0.0/0 via 10.4.0.1, eth0
B>* 10.0.0.0/16 [20/100] via 169.254.10.1, vti1, 00:00:37
  *                      via 169.254.11.1, vti2, 00:00:37
C>* 10.4.0.0/22 is directly connected, eth0
B>* 10.8.0.0/16 [20/100] via 169.254.10.1, vti1, 00:00:37
  *                      via 169.254.11.1, vti2, 00:00:37
B>* 10.16.0.0/16 [20/100] via 169.254.10.1, vti1, 00:00:37
  *                       via 169.254.11.1, vti2, 00:00:37
B>* 10.17.0.0/16 [20/100] via 169.254.10.1, vti1, 00:00:37
  *                       via 169.254.11.1, vti2, 00:00:37
C>* 127.0.0.0/8 is directly connected, lo
C>* 169.254.10.0/30 is directly connected, vti1
C>* 169.254.11.0/30 is directly connected, vti2
K>* 169.254.169.254/32 is directly connected, eth0
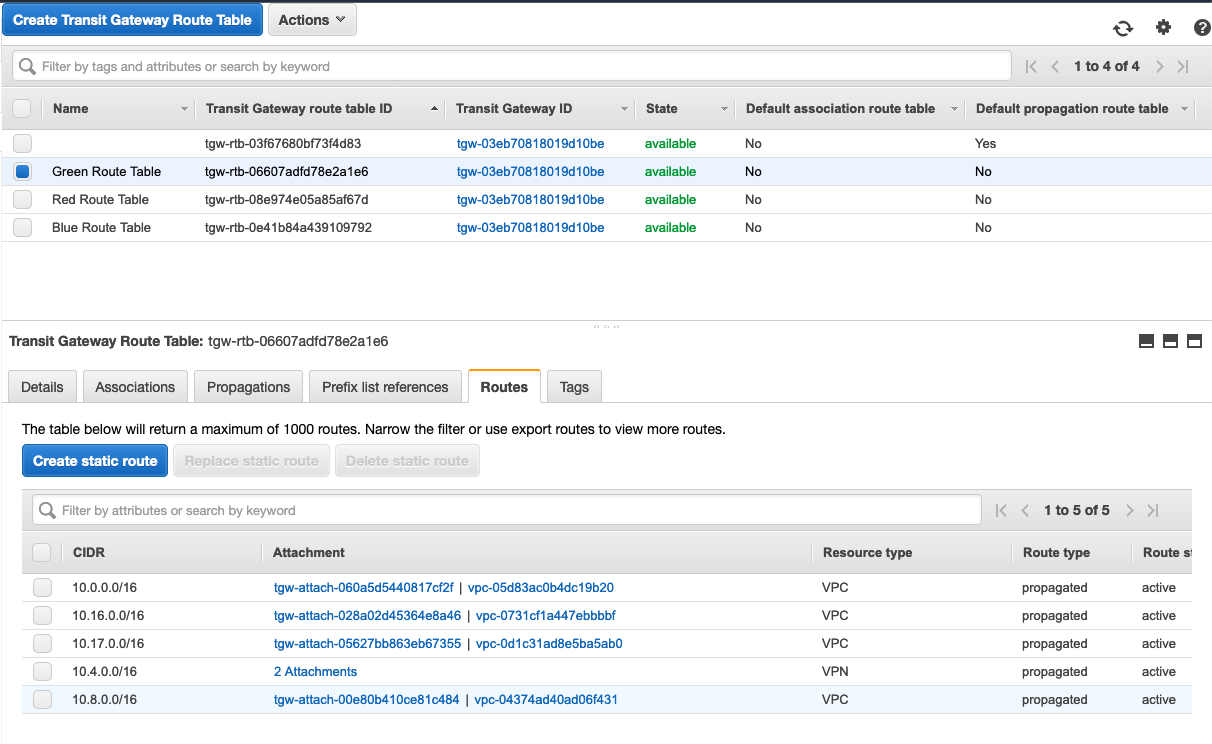
为了验证这些路由来自哪里,我们可以看一下Green Route Table。
点击 https://us-east-2.console.aws.amazon.com/vpc/home?region=us-east-2#TransitGatewayRouteTables:
选择 Green Route Table, 中的 Propagations 便签页,一共有 5 条路由。
检查 Site-to-site VPN
点击 https://us-east-2.console.aws.amazon.com/vpc/home?region=us-east-2#VpnConnections:sort=VpnConnectionId
选择 VPN connect
在 tunnel Details 便签页。 发现两个 Tunnel 已经是 Up 的状态。
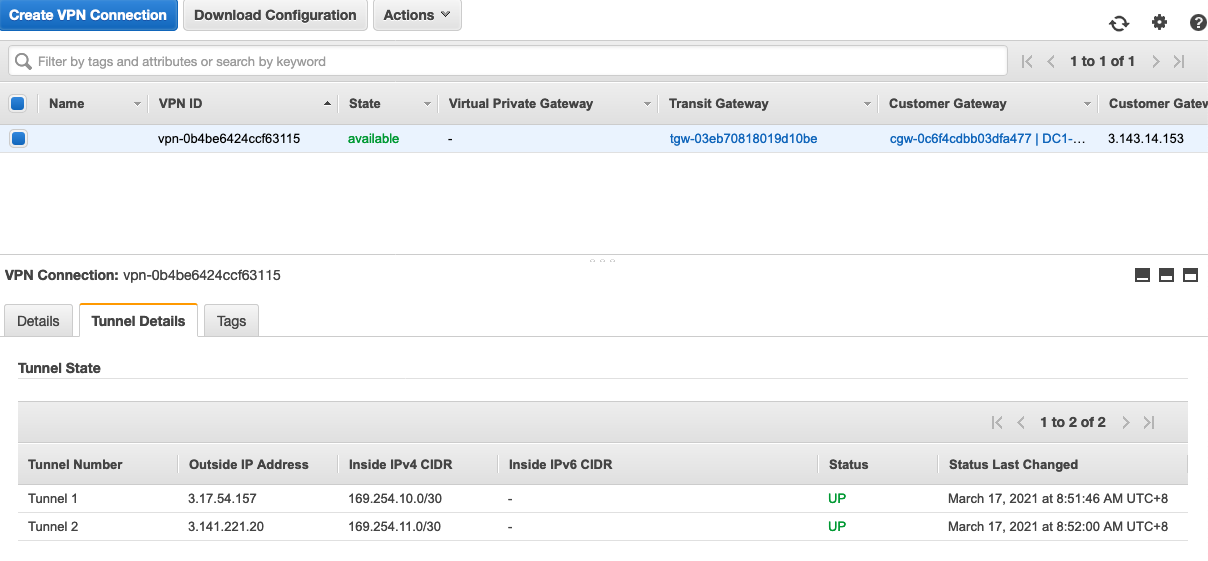
支持说明 Site-to-Site VPN已经创建成功。